Add New User

PLEASE NOTE: Only Admin Users can set up new users.
-
- Log into the Evidence Me Web Suite using your Admin user details
- Click on the menu icon
 in the top left-hand corner
 - Click Admin
- Click on your organisation name so that it highlights in blue
- Click the
 icon under organisation users
 - PLEASE NOTE: If nothing happens when you click on the plus icon this indicates that you have not followed step 4
- Enter the user’s email address
- Enter the user’s first and last name
- You can type the user’s display name in manually however you can leave this blank and it will automatically display as the user’s full name
- Leave the Password fields empty
- Select the User Type (you can add more than one user type for example Organisation Admin & Organisation Staff)
- Organisation Admin – only able to access the Administration area
- Organisation Staff – only able to access Evidence Me
- Leave the Activate Account box unticked
- Click Create
A welcome email will automatically be sent to the user to set up their own password and activate their account (please note this email is only valid for 30 days before it expires).
Click here to watch our help video on how to add new users.
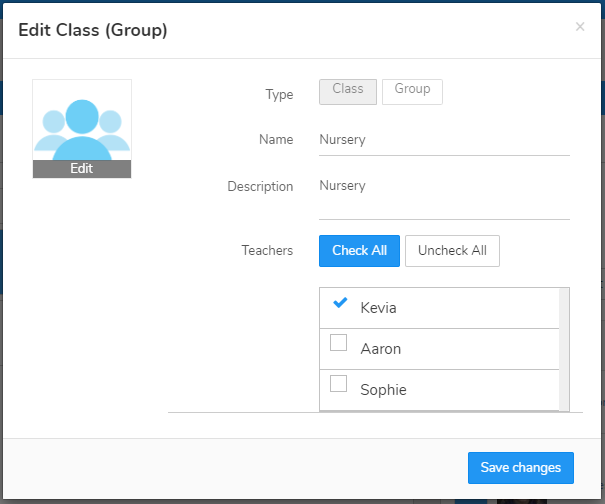
Assign New Users to a class
When Using the mobile app the user will only be able to add learners and view learner profiles from the classes that they are assigned to. Therefore, when you add a new user you must assign them to the classes that they need to have access to. Follow the steps below to add a user to the classes that they need access to:
-
- Log in to your websuite
- Click Learners
- Select a class so that it highlights in blue
- Click on the edit icon
 along the Classes bar
 - Next to Teachers check the teachers who need to be able to access this class
- Click Save changes
Edit Existing Users
-
- Click on your organisations name so that it highlights in blue
- Click on the user’s name so that it highlights in blue
- Click on the edit icon on the Organisation Users bar
- Make the required changes
- Click Save Changes
Delete Users
Please note only admin users can delete users
Before deleting a user you need to ensure the user has been unassigned from any groups or classes. Please follow the below steps:
-
- Log in to your websuite
- Click on the menu icon in the top left-hand corner
- Click Admin
- Click on your organisation name so that it is highlighted in blue
- Click on the user’s name so that it is highlighted in blue
- Click on the edit icon
- Click Select to unassign the user from any classes


- Click Unselect All
- Click Save Change
- Click on the user’s name again so that it is highlighted in blue
- Click on the delete icon
 on the Organisation Users bar
 - Click Delete – Please note that this user will be permanently deleted
NOTE: If you have any archived classes make sure that the teacher that you are trying to delete has been removed from those classes too! In the learner’s area just click on the “Archived Classes” tab and edit each class to check.
Alternatively, you can unassign users from any groups or classes by following the below steps:
-
- Log in to your websuite
- Click Learners
- Select a class so that it is highlighted in blue
- Click on the edit icon along the Classes bar
- Next to Teachers uncheck the teachers who need to be deleted
- Click Save changes